Create a survey publisher app
This guide covers the publisher app used for survey SDK and survey offerwall integrations. Offers V2 uses its own placement and ad slot setup; those controls are separate from the app settings shown here.
Before you start
Prepare the public app or website URL, platform, currency name and exchange value, a stable user ID scheme, and a server endpoint that can receive reward callbacks. Use a development or test user while integrating. You can save the app before its callback endpoint is ready, but rewards should not go live until your server verifies and deduplicates callbacks.
Create the app
- Sign in as a publisher and open Apps → Create New Application.
- Enter App Name, Virtual Currency Name, Virtual Currency Value, and choose Integer or Float for the currency type. Check that the exchange value matches what your users will see.
- Select the App Platform: iOS, Android, Unity, Flutter, React Native, or Web. Choose the app category and enter its store URL, or website URL for Web.
- Enter a Callback/Postback URL if your server is ready, then choose Save Changes. Return to the app to finish setup and request approval.
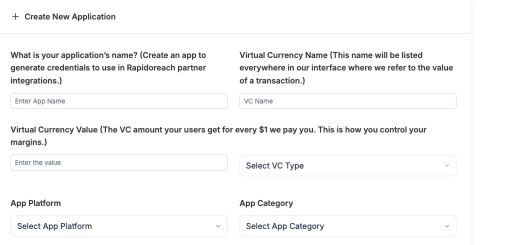
The screenshot shows the current dashboard form with an empty test app. Do not copy values from a screenshot into production; use your own app identity and currency policy.
Finish the app settings
Open the saved app. Its detail screen has Callback, Credentials, App settings, Test users, Integration guide, and Edit virtual currency tabs.
| Tab | What to complete |
|---|---|
| Callback | Save the server callback URL and send a test to your endpoint. Verify the actual payload and signature or token according to reward callbacks. |
| Credentials | Copy the values required by your chosen SDK or web integration into protected configuration. Do not publish app keys, tokens, or callback secrets. |
| App settings | Review the survey offerwall switch, theme, screenout reward, maximum survey length, and available survey category or industry filters. Request approval when setup is ready. |
| Test users | Add controlled user IDs for integration tests. Keep production user IDs out of public test material. |
| Integration guide | Follow the instructions for the selected platform, then run an end-to-end test. |
| Edit virtual currency | Recheck conversion and display settings before exposing rewards to users. |
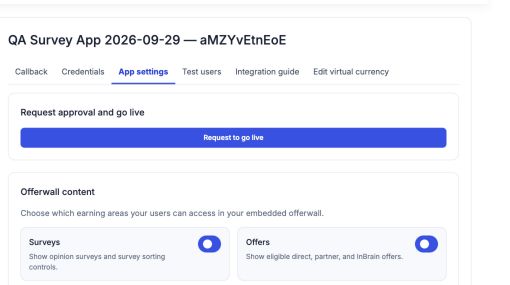
The Show offers in offerwall switch on this legacy app screen does not create or configure an Offers V2 placement. Use Offers V2 placements when that is the product you are integrating.
Test and request approval
- Follow the SDK or web quickstart and open the offerwall with a stable test user ID.
- Check eligible and empty inventory states on a device matching the selected platform.
- Exercise the callback test and an actual development reward path. Credit each transaction once on your server; an SDK close event is not reward proof.
- Review the App settings and choose Request approval and go live. An app awaiting approval is not evidence that live survey delivery is enabled.
Use the publisher testing guide for callback, duplicate, and device checks. For survey entry and result contracts, use the separate publisher survey API reference.